Software Architecture Overview
Warning
Currently none of the interfaces (hardware, software) are definitive. This means that we might still change this. Developing educational material around Mirte is possible, but you should be able to modify this in case we change the interfaces.
Software Architecture
As the robot is meant for education, most of the design decisions we made were made with that in mind. This means we were forced to make decisions in the speed vs usability (/learnability) tradeoff and decided to go for the learnability over speed. We this improving speed should, at some point, be done by the students themselves.
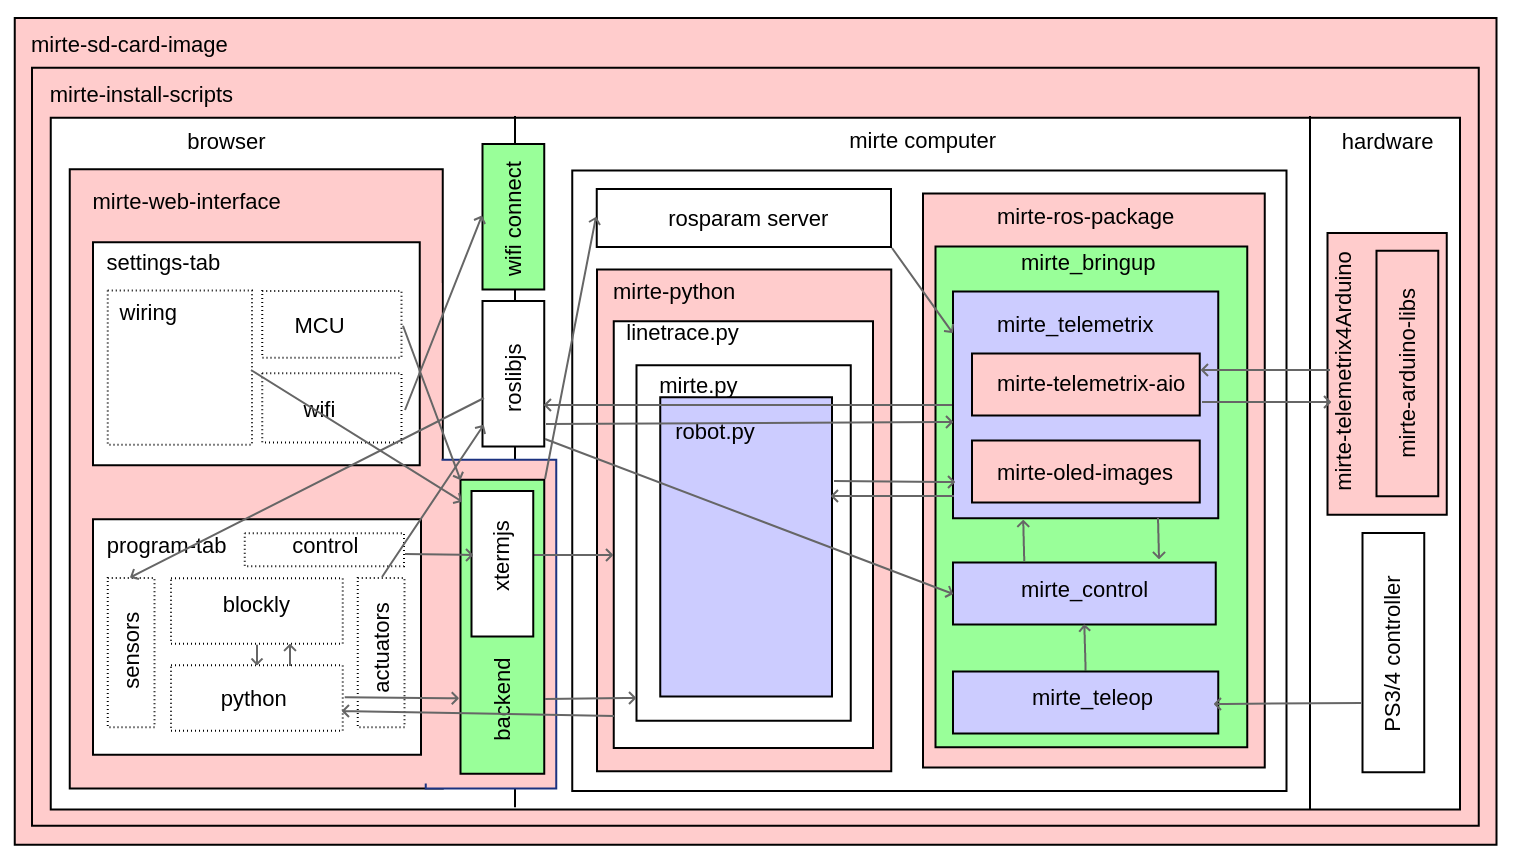
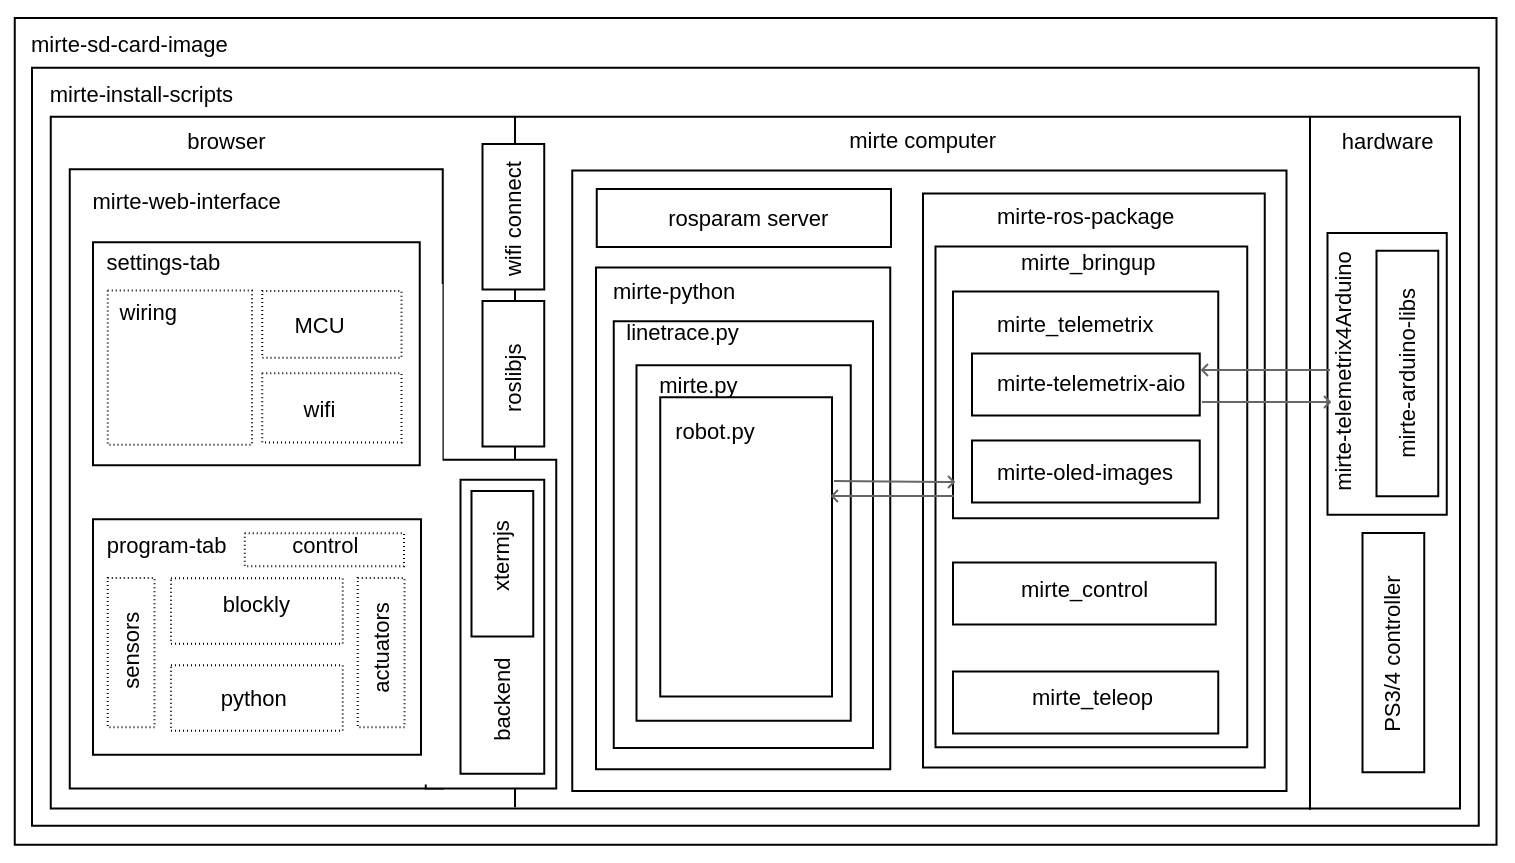
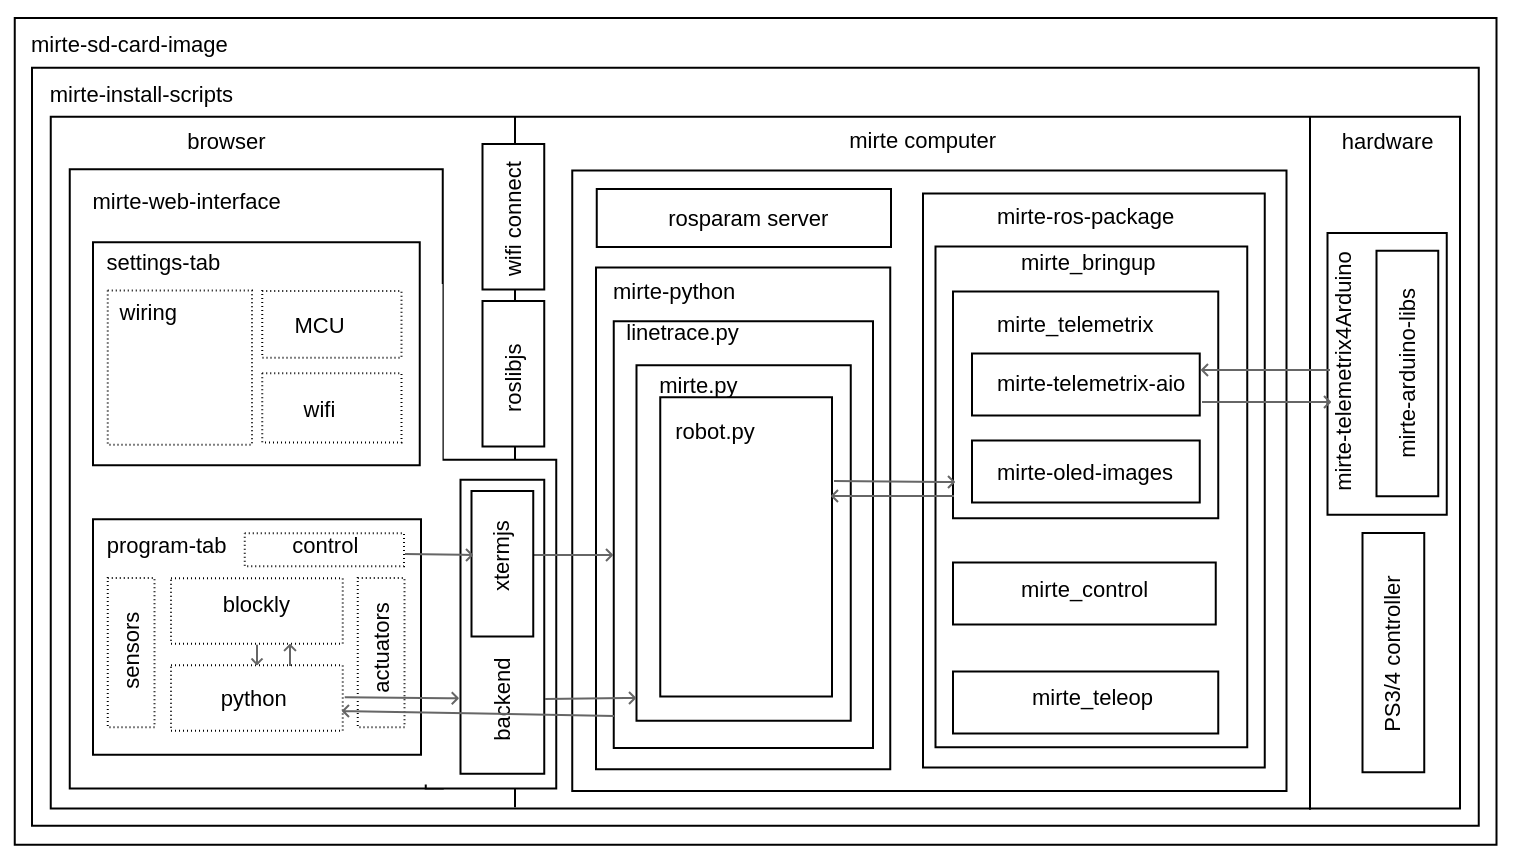
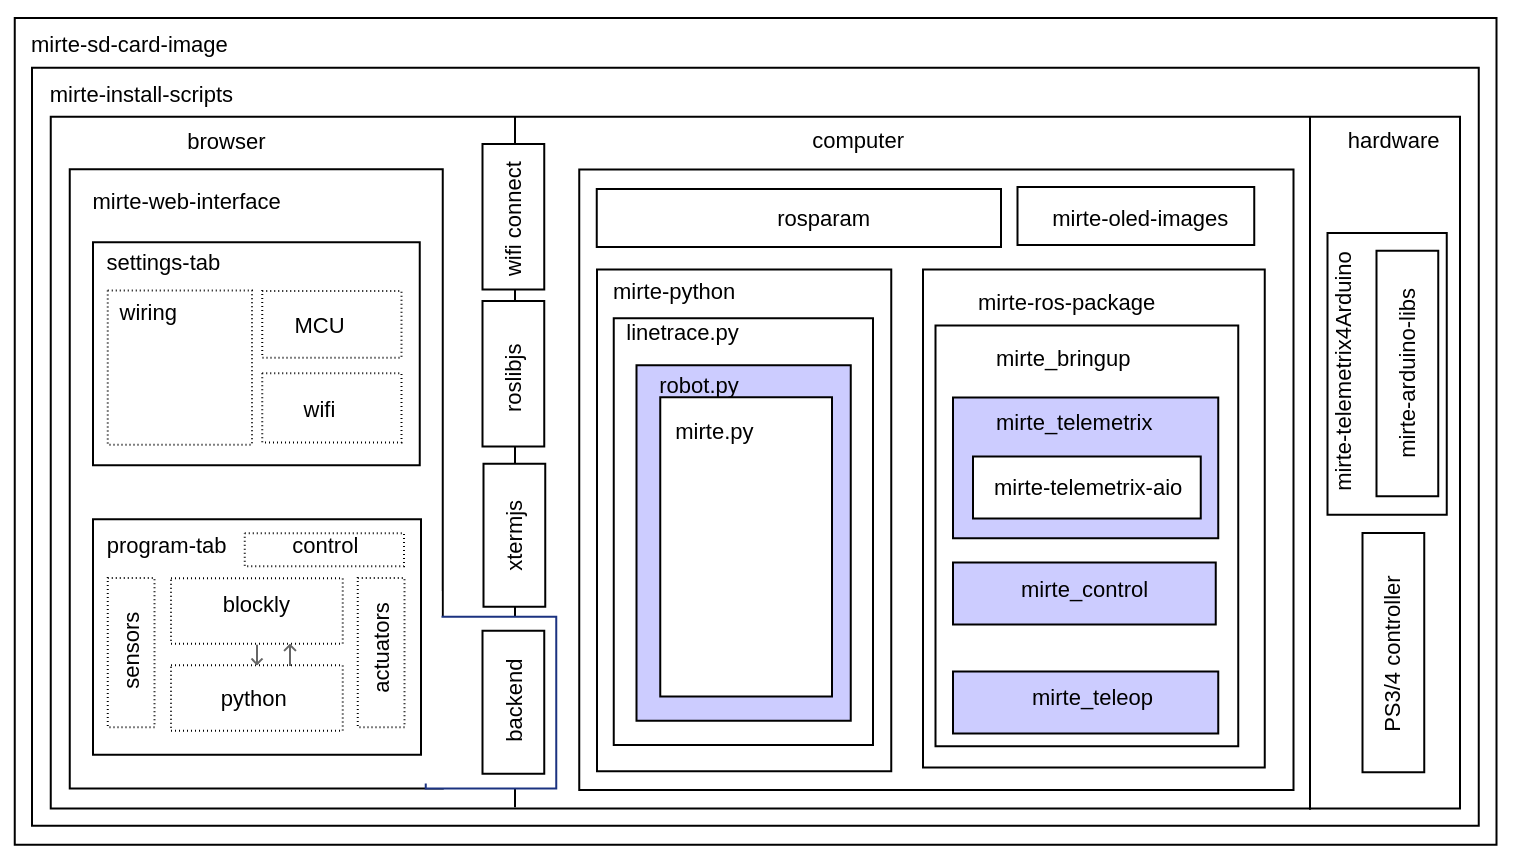
Full architecture overview of the Mirte software. Repositories are shown in red, ROS nodes in blue, and systemd services in green. More explanation can be found in the corresponding tabs. The dataflow is shown with arrows and will be explained in the next section.
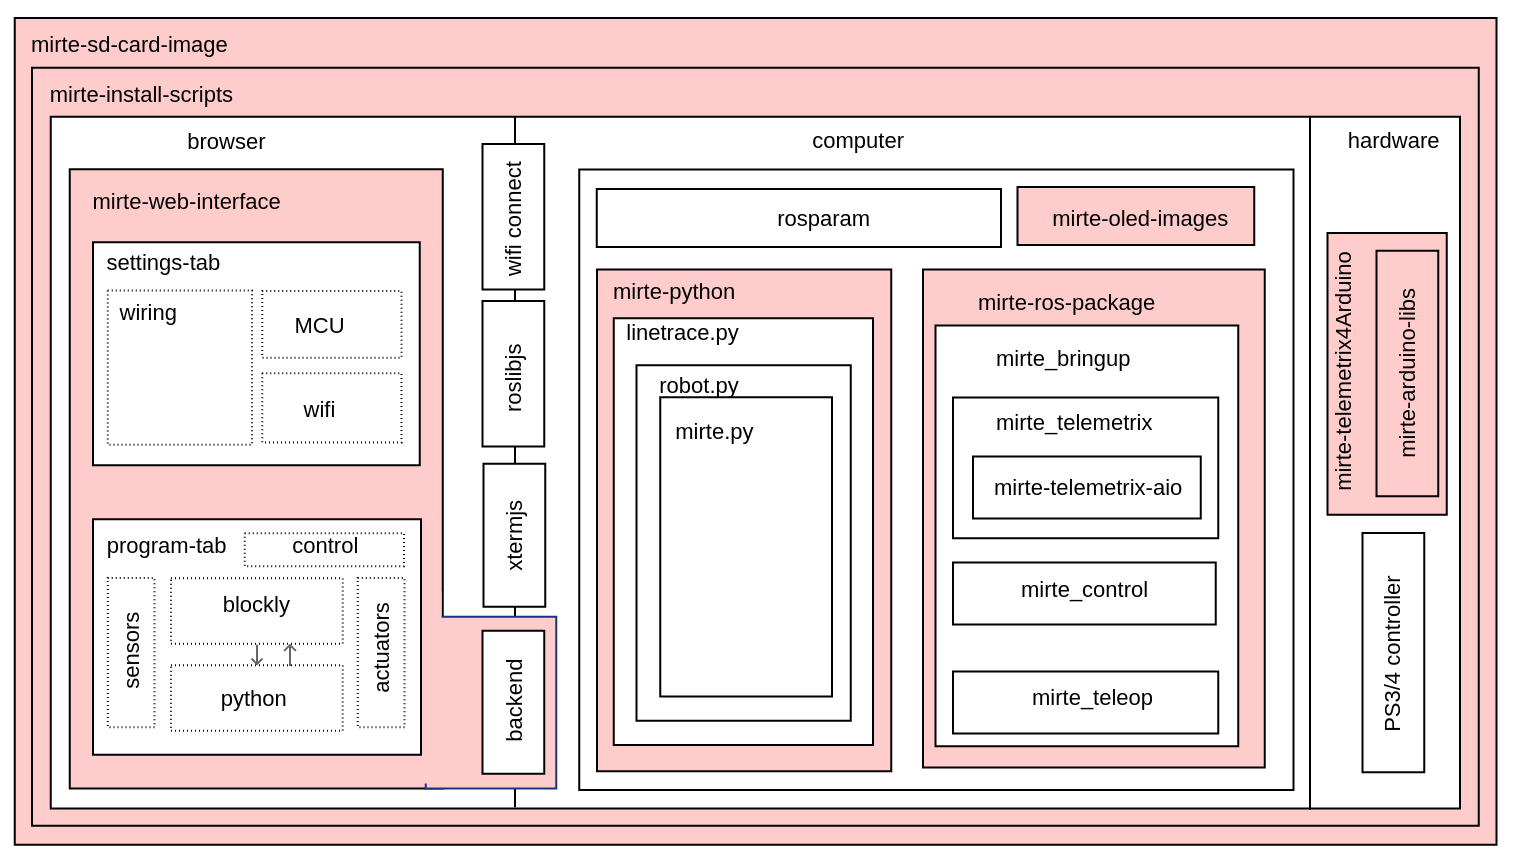
The software of Mirte is stored in multiple repositories on github, but can also be found on the Mirte robot in /usr/local/src/mirte.
mirte-web-interface: Is the repository where the Vue frontend and nodeJS backend are stored. They are in one repository since they are frequently updated together.
mirte-python: Contains the python API of the sensors and actuators. This basically is a wrapper around the ROS topics and services for all the sensors and actuators.
mirte-ros-packages: Contains the ROS packages to communicate with the hardware (MCU, PS controller, camera, etc) and the differential drive controller.
mirte-telemetrix-aio: Is a fork of telemetrix-aio to also support our own wheel encoder library (needed to get the interrupts of the encoder).
mirte-telemetrix4Arduino: Is a fork of telemetrix4Arduino to also add support for the wheel encoder.
mirte-arduino-libraries: Contains the implementation of our own wheel encoder.
mirte-oled-images: Contains the images and image sequences to show on the OLED.
mirte-install-scripts: Contains all scripts needed to install the Mirte software on the robot. This includes our own repositories and dependencies, but also creates a user and enables the Wifi AP and systemd services.
mirte-sd-image-tools: Contains all things needed to build an ARM sd card image with everything installed from the mirte-install-scripts repo for both the Orange Pi Zero 2 (Armbian Ubuntu) and Raspberry Pi (Ubuntu).
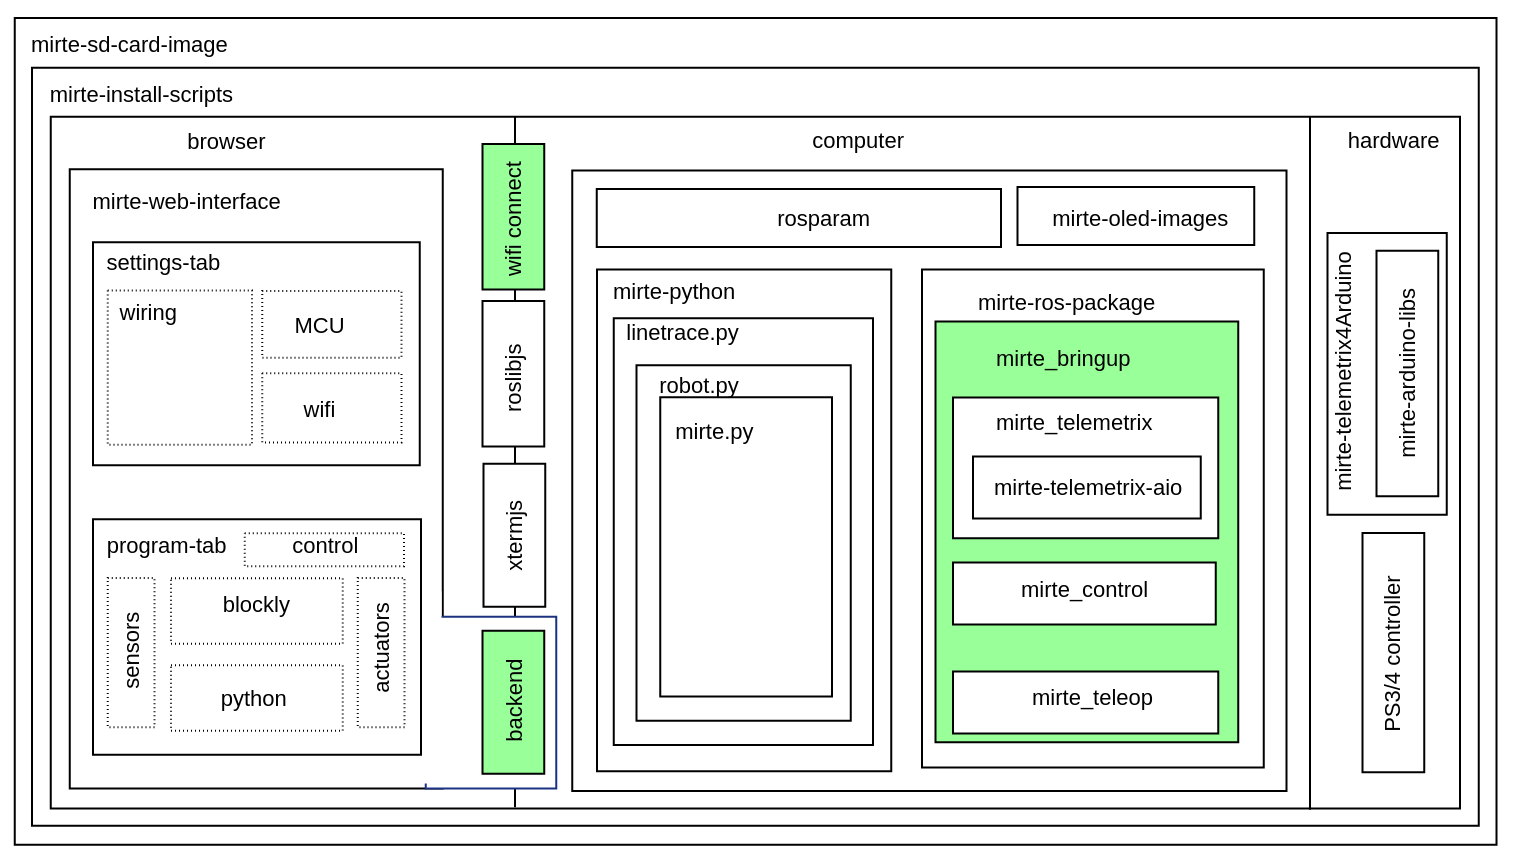
A couple of ROS nodes are used to control the robot (please note that the default for ROS packages are underscores):
mirte_telemetrix: This node initializes the telemetrix-aio pins based on the settings in the ROS parameter server. Each actuator will create a corresponding service. Each sensor will create both a service and a topic.
mirte_control: This is the ROS control wrapper for a differential drive robot. ROS control will already account for the kinematics from Twist message to rad/s per wheel. This rad/s per wheel is then transformed to speed (range -100 to 100) of the robot.
mirte_teleop: This can be the teleop-key or teleop-joy node. In both cases the input from the device will be transformed into a Twist message.
robot.py: The robot.py node is included in the user defined python script. When run, this will start as a node as well. This node is only active when the user runs their script.
In order to start all needed software on boot there are 3 systemd services activated:
mirte-ap: Service which starts the wifi-connect software. This will bring up a Wifi AP when no connection to a known network can be established. Otherwise it will connect to the known router. This service is executed as root.
mirte-web-interface: Service starts the web interface backend. The backend will also serve the frontend built by VueJS. This service is executed as the mirte user.
mirte-ros: Service will bringup ROS by launching minimal.launch. This service is executed as the mirte user.
mirte-jupyter: Service will start Jupyter Notebook which can be accessed on port 8888.
All of them will start at boot, but can also be stopped:
mirte$ sudo service mirte-ros stop
, started:
mirte$ sudo service mirte-ros start
, or inspected:
mirte$ sudo journalctl -u mirte-ros -f
Software Flows
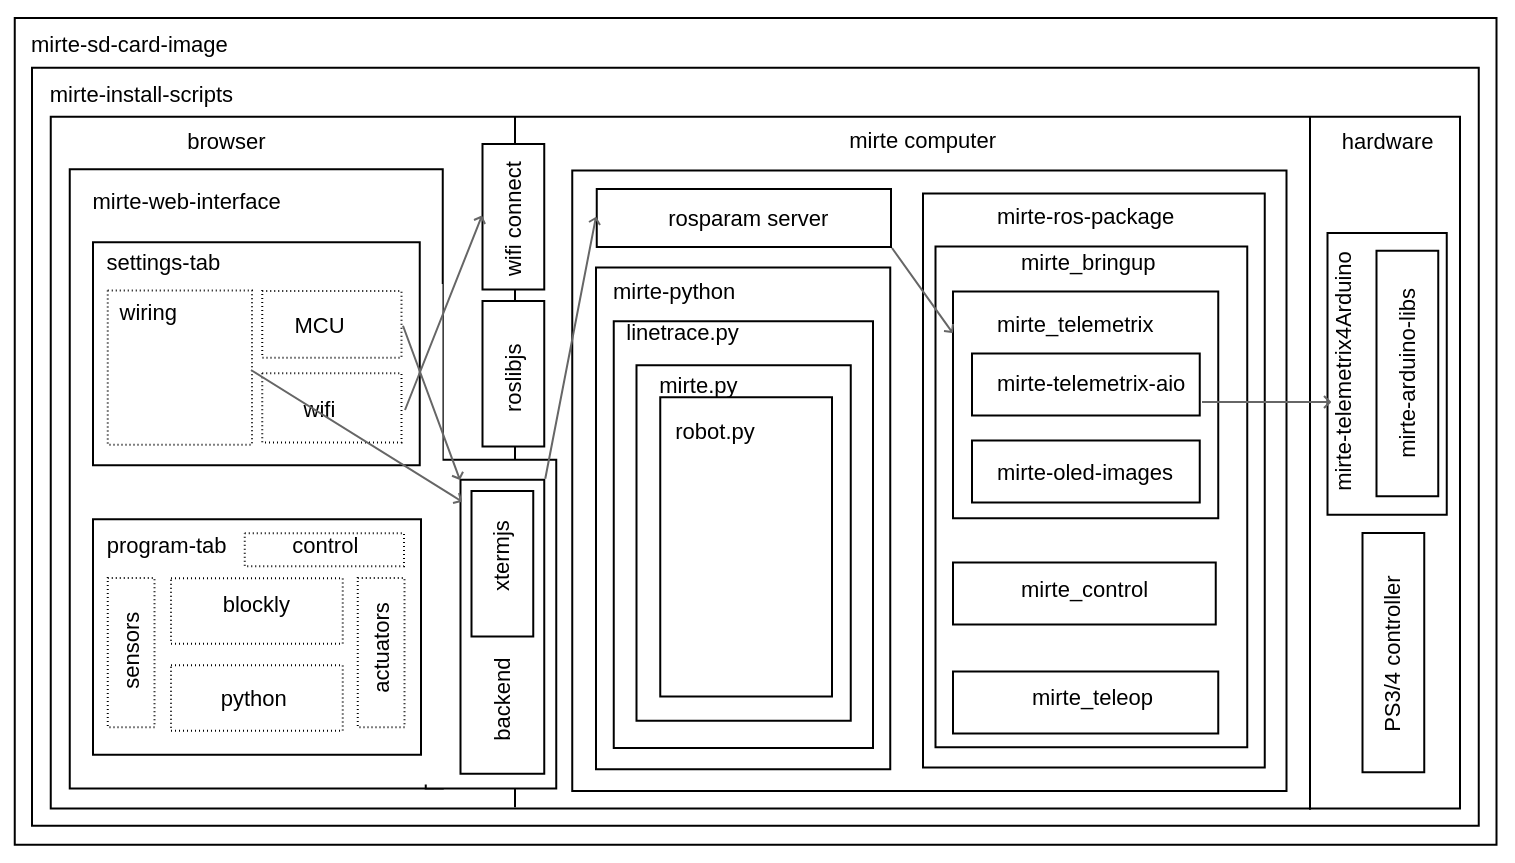
Like described earlier there are some things that you need to set before you can use the robot. This involves both uploading telemetrix to the MCU, and defining the connected hardware. Both can be done via commandline and web interface.
When uploading telemetrix to the MCU from the web interface, a request will be sent to the backend to execute the same command as you would execute when in a terminal.
When a user changes the settings in the web interface a YAML file is generated and uploaded via the backend to the robot. This will overwrite the mirte_user_config.yaml file and overwrite the parameters in the running parameter server. The backend will also stop the running telemetrix node and restart it so the initialization will be done again with the new parameters. By restarting the telemetrix node, this node will get the new settings from the parameter server and initialize this using mirte-telemetrix-aio which will apply it on the MCU with mirte-telemetrix4Arduino.
You can also connect to your own wifi. Whe doing this from the web interface, it will communicate the change right away to the wifi-connect server which will use NetworkManager accordingly.
Note
In the current implementation the YAML config is generated in the web interface and uploaded to the robot through the backend. We will redesign this in the future and implement a version where the web interface will communicate via roslibjs and therefore also be able to reflect the settings as they are.
Note
Usually one does not change the parameters within a running ROS system. We do think that these kind of settings belong to the parameter server since they usually do not change. In this educational robot we try to also make it easy to modify your robot.
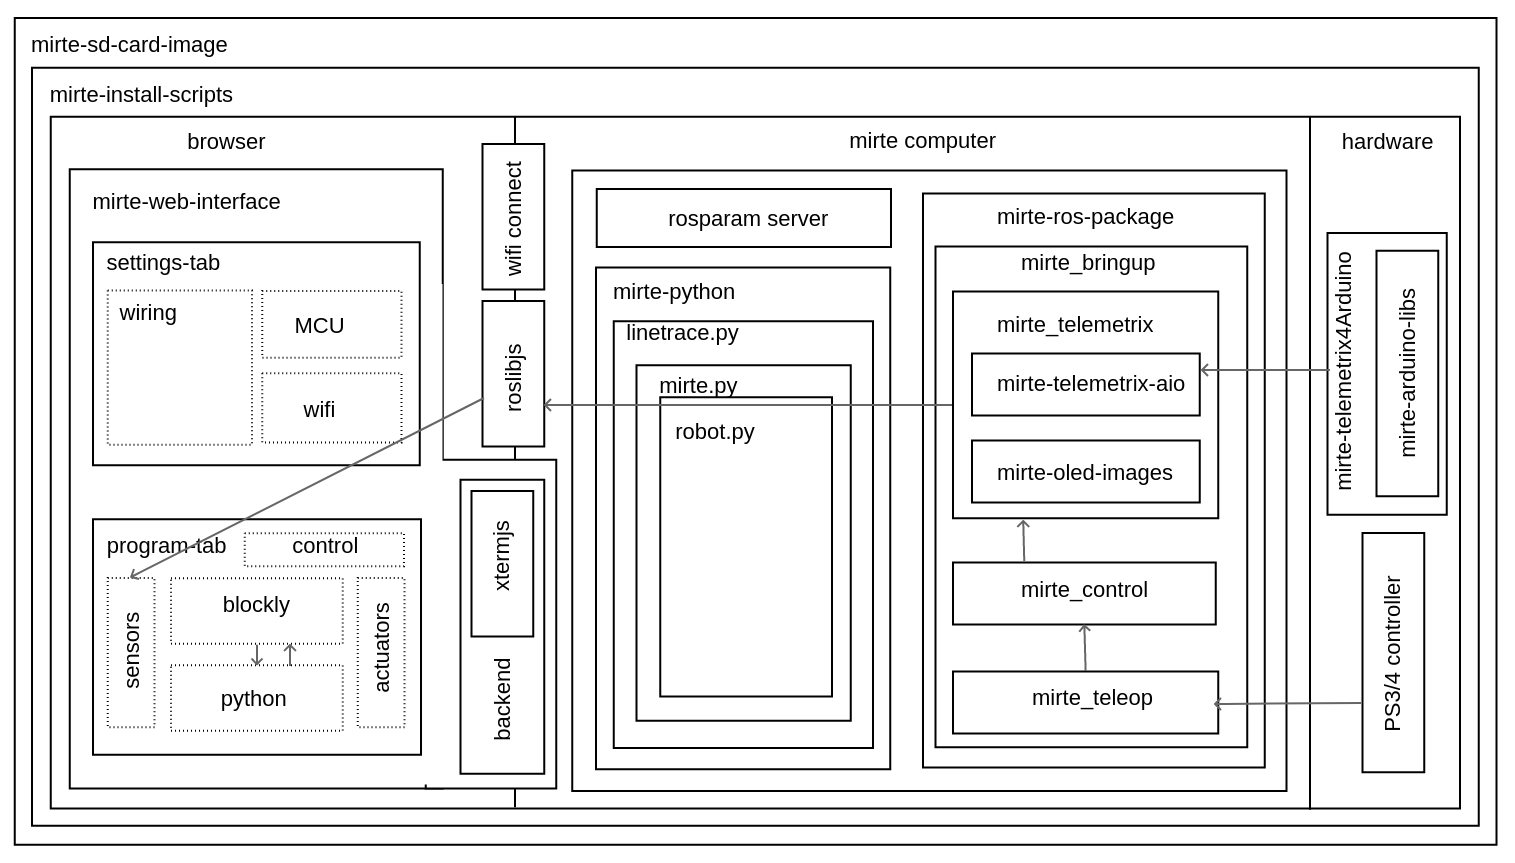
Sensordata are read continuously in telemetrix (with a preset frequency). They are then communicated over USB from the MCU via mirte-telemetrix4Arduino to mirte-telemetrix-aio. The ROS node ROS_telemetrix_api.py from mirte_telemetrix will read these values as they get in via the callback from mirte-telemetrix-aio. They will then be published as a topic, and the last value is stored in order to be returned by a service call. These sensor values will the be send to the webinterface via roslibjs.
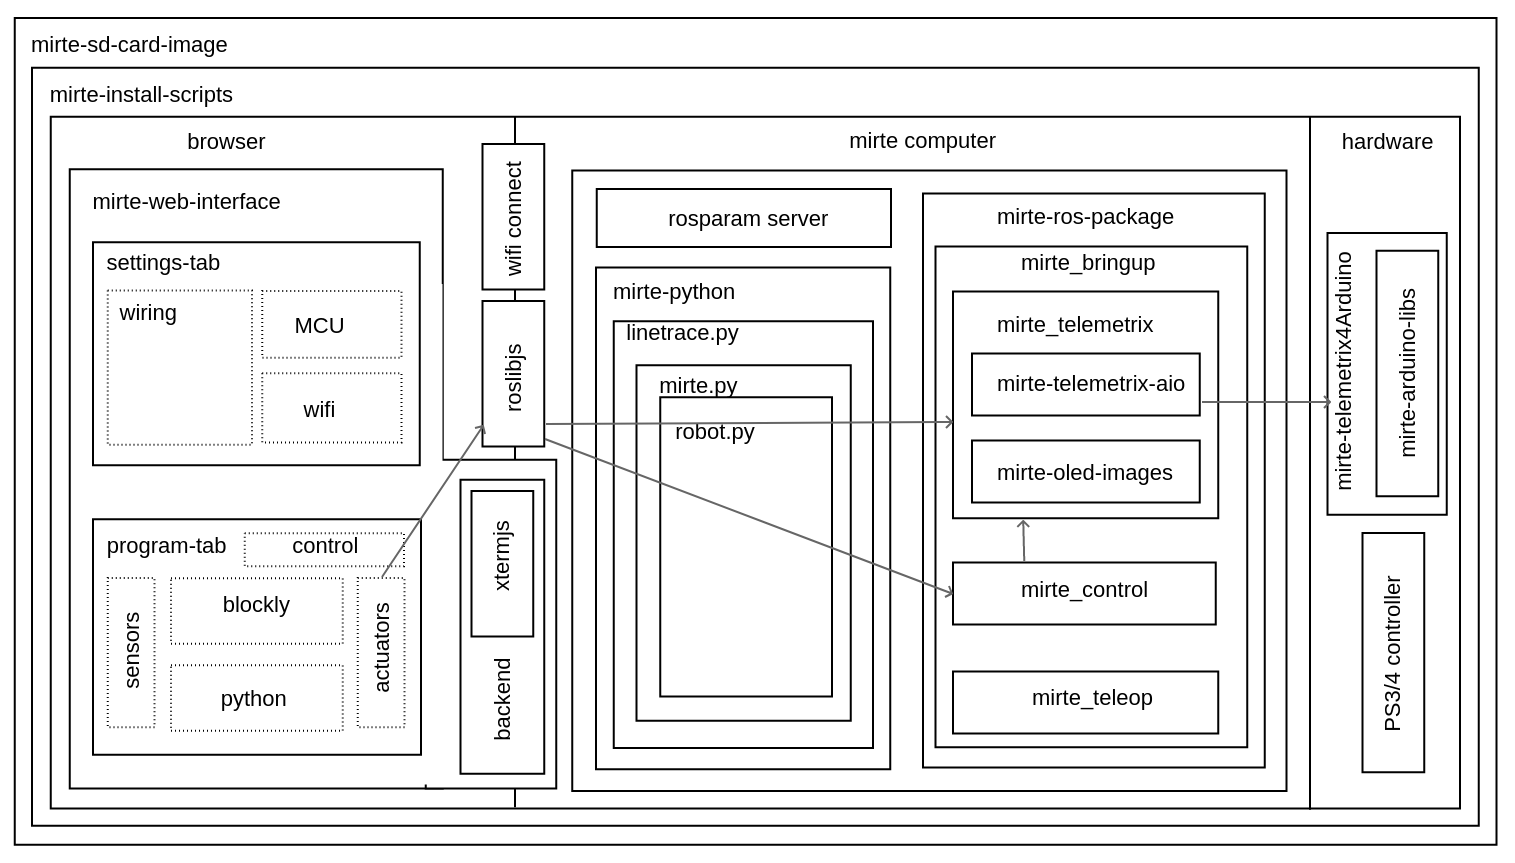
When a user changes the actuator values in the web interface this will be communicated to the ROS_telemetrix_api.py node from mirte-telemetrix-aio (or to mirte-control in case a Twist message is generated to drive around). The ROS_telemetrix_api.py node will the call the corresponding mirte-telemetrix-aio function which will pass this to mirte-telemetrix4Arduino on the MCU.
