Programming the MCU
Instead of using the full MIRTE architecture including ROS, python and blockly, you can also only program on the MCU. Where the standard MIRTE software using telemetrix is making the MCU a dumb slave, this setup will make your SBC a dumb slave. One option of course is to connect your MCU to your own computer. This section covers some options to program the MCU from your computer over the air (wireless) where the SBC is just a wifi spot to your MCU.
Warning
When reprogramming the MCU (and thus removing telemetrix from the MCU) all other features of MIRTE will not work anymore. You will only be able to control the robot through the MCU code. You can of course always get back to the original situation by preparing the microcontroller again.
Note
Uploading to the MCU might fail. Especially the STM32 is quite picky on the code that will be uploaded to the MCU (for example ‘PC_13’ instead of ‘PC13’). This means that the DFU upload over USB might not work. When this fails, you cal also try to press the physical reset button on the MCU at the moment the upload should start.
Upload from terminal
You can create your own projects in the arduino_project folder. This is also where the Telemetrix code is stored, and an example Blink program. In order to create your own arduino project you can:
mirte$ cd ~/arduino_project/
mirte$ mkdir MyFirstProject
mirte$ cp Blink/Blink.ino MyFirstProject/MyFirstProject.ino
mirte$ cd /usr/local/src/mirte/mirte_install_scripts/
mirte$ ./run_arduino.sh build MyFirstProject
mirte$ ./run_arduino.sh upload MyFirstProject
mirte$ cd ~/arduino_project/
mirte$ mkdir MyFirstProject
mirte$ cp Blink/Blink.ino MyFirstProject/MyFirstProject.ino
mirte$ cd /usr/local/src/mirte/mirte_install_scripts/
mirte$ ./run_arduino.sh build_nano MyFirstProject
mirte$ ./run_arduino.sh upload_nano MyFirstProject
mirte$ cd ~/arduino_project/
mirte$ mkdir MyFirstProject
mirte$ cp Blink/Blink.ino MyFirstProject/MyFirstProject.ino
mirte$ cd /usr/local/src/mirte/mirte_install_scripts/
mirte$ ./run_arduino.sh build_nano_old MyFirstProject
mirte$ ./run_arduino.sh upload_nano_old MyFirstProject
mirte$ cd ~/arduino_project/
mirte$ mkdir MyFirstProject
mirte$ cp Blink/Blink.ino MyFirstProject/MyFirstProject.ino
mirte$ cd /usr/local/src/mirte/mirte_install_scripts/
mirte$ ./run_arduino.sh build_uno MyFirstProject
mirte$ ./run_arduino.sh upload_uno MyFirstProject
Note
Compiling on the Orange Pi Zero might be really really slow.
Using Platform IO
If you like a faster compilation time and/or like to develop from an IDE, you can also develop your code using Platform IO. Make sure you have installed Platform IO for your IDE.
The next steps assume you have installed VS Code with Platform IO.
Create a new project by following the first two steps as described here. You can still use the Arduino Uno in the example, you will override this later.
Replace the existing platformio.ini file of your project with the one below (replace <mirte_ip_address> with the IP address of your robot.
Start coding in main.cpp
[env:genericSTM32F103C8]
platform = ststm32
board = genericSTM32F103C8
framework = arduino
upload_protocol = custom
upload_command = scp $SOURCE mirte@<mirte_ip_address>: && ssh mirte@<mirte_ip_address> /usr/bin/run-avrdude upload
; build flags needed due to bug: https://community.platformio.org/t/difficulty-with-getting-usb-serial-usb-cdc-working/7501/6
; AND to compensate for not using upload_protocol dfu
build_unflags = -Wl,--defsym=LD_FLASH_OFFSET=0x0
build_flags =
        -D PIO_FRAMEWORK_ARDUINO_ENABLE_CDC
         -D USBCON
         -D USBD_VID=0x0483
         -D USBD_PID=0x5740
         -D USB_MANUFACTURER="STMicroelectronics"
         -D USB_PRODUCT="\"BLACKPILL_F103C8 CDC in FS Mode\""
         -D HAL_PCD_MODULE_ENABLED
         -D BL_LEGACY_LEAF
         -D VECT_TAB_OFFSET=0x2000
         -Wl,--defsym=LD_FLASH_OFFSET=0x2000
[env:nanoatmega328new]
platform = atmelavr
board = nanoatmega328new
framework = arduino
upload_protocol = custom
upload_command = scp $SOURCE mirte@<mirte_ip_address>: && ssh mirte@<mirte_ip_address> /usr/bin/run-avrdude upload
[env:nanoatmega328]
platform = atmelavr
board = nanoatmega328
framework = arduino
upload_protocol = custom
upload_command = scp $SOURCE mirte@<mirte_ip_address>: && ssh mirte@<mirte_ip_address> /usr/bin/run-avrdude upload
[env:uno]
platform = atmelavr
board = uno
framework = arduino
upload_protocol = custom
upload_command = scp $SOURCE mirte@<mirte_ip_address>: && ssh mirte@<mirte_ip_address> /usr/bin/run-avrdude upload
Note
PlatformIO will ssh/scp into MIRTE two times asking for your password. It might be useful to create a setup where you login using SSH keys.
Using the Arduino IDE
Warning
Uploading over the air with Arduino IDE is not perfect. For one it uses mDNS which is not supported by Windows 10. It also requires root login on the SBC which is far from optimal. We therefore might decide on removing this feature, so be careful when using this in any educational material.
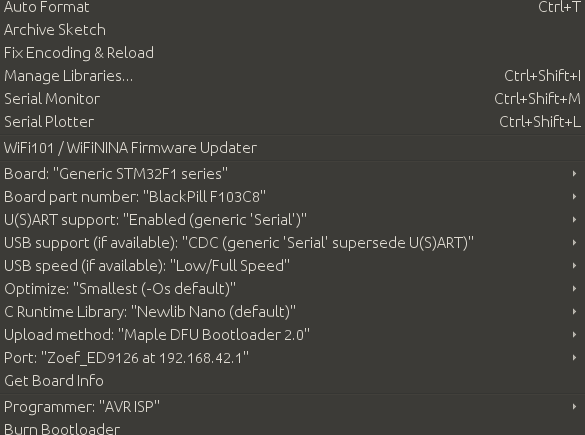
The Arduino IDE should be configured in the same way as if the MCU was connected to the PC through USB. For the STM this means:
Add ‘https://github.com/stm32duino/BoardManagerFiles/raw/master/STM32/package_stm_index.json’ to ‘File’ > ‘Settings’ > ‘Additional Boards Manager URLs’
Install ‘STM32 Cores’ from ‘Tools’ > ‘Board: xxxx’ > ‘Boards Manager…’
Select ‘Generic STM32F1 series’ as ‘Board’, and make sure the other settings are as in the image below.
Compile and run will compile locally and upload the hex to MIRTE (passwd: mirte_mirte)
