MoveIt!
MoveIt2 is already installed on the MIRTE Master. This tutorial includes remotely controlling the arm using RViz from a remote computer, and basic control of the arm using the MoveIt2 Python API.
Installation
The easiest way to move the arm and gripper is to use RViz. Since this is a GUI we need to run this from a remote machine/laptop in the same network. For this, make sure you have ROS2 humble installed, and that you have created a ROS2 workspace. We still need to install the MIRTE MoveIt package:
The most safe way to do this is installing the package that is installed on the actual robot:
$ cd mirte_ws/src
$ scp -r mirte@mirte.local:/usr/local/src/mirte/mirte-ros-packages .
You can also install the latets MIRTE MoveIt package from github. This one might be out of sync with the software on the robot though:
$ cd mirte_ws/src
$ git clone https://github.com/mirte-robot/mirte-ros-packages
And you need to make sure that your LC_NUMERIC is set to en_US.UTF-8:
$ sudo update-locale LC_NUMERIC=en_US.UTF-8
$ export LC_NUMERIC=en_US.UTF-8
Optionally, you can remove the unused ROS packages. This will make the install, and build go much faster. Only do this as long as you have no changes in these folders.
$ cd mirte-ros-packages
$ rm -r mirte_bringup/ mirte_telemetrix_cpp/ mirte_teleop/ mirte_test/ mirte_zenoh_setup/
$ cd ../..
$ rm mirte_msgs/COLCON_IGNORE
$ rosdep install --from-paths src --ignore-src -r
$ colcon build
Rviz
Now that we have installed the MIRTE MoveIt package, we can launch the setup:
$ source install/setup.bash
$ ros2 launch mirte_moveit_config mirte_moveit.launch.py
The MIRTE arm has two planning groups (mirte_arm, and mirte_gripper). You can now select which planning group you want to use (eg. mirte_arm), and select a goal state. There are couple of preset states (open/close for the mirte_gripper, and home for the mirte_arm).
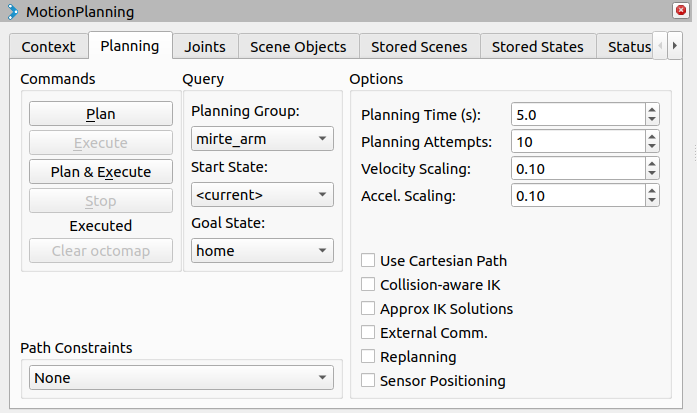
By pressing “Plan & Excecute”, the robot will execute the planned trajectory. For safety reasons the default velocity and acceleration scaling is set to 0.10. You can change this to 1.0 if you want the arm to move faster.
Note
Due to the 4DOF nature of the arm, the blue selector in RViz is not usable.
MoveIt2 C++ API
But of course the most usefull way to use MoveIt, is in your own code. This is why there are C++ API for MoveIt. The example below will show you how to use this API to move the end effector of the robot to a certain position. Note that this is a MIRTE modified version of the MoveIt tutorial.
Note
For later versions of ROS2, there is also a Python API.
The first this we need to do, is create a new C++ package:
$ cd ~/mirte_ws/src
$ ros2 pkg create --build-type ament_cmake --license Apache-2.0 --node-name moveit_example mirte_planning --dependencies rclcpp moveit_ros_planning_interface geometry_msgs
And modify the moveit_example node to:
#include <memory>
#include <thread>
#include <rclcpp/rclcpp.hpp>
#include <moveit/move_group_interface/move_group_interface.h>
#include <geometry_msgs/msg/pose_stamped.hpp>

int main(int argc, char * argv[])
{
  // Initialize ROS and create the Node
  rclcpp::init(argc, argv);

  auto const node = std::make_shared<rclcpp::Node>(
    "moveit_node",
    rclcpp::NodeOptions().automatically_declare_parameters_from_overrides(true)
  );

  // Start spinning in a separate thread
  rclcpp::executors::SingleThreadedExecutor executor;
  executor.add_node(node);
  std::thread spinner([&executor]() {
    executor.spin();
  });

  // Wait for some initialization work
  rclcpp::sleep_for(std::chrono::seconds(2));

  // Create a ROS logger
  auto const logger = rclcpp::get_logger("moveit_node");

  // Create the MoveIt MoveGroup Interface
  using moveit::planning_interface::MoveGroupInterface;
  auto move_group_interface = MoveGroupInterface(node, "mirte_arm");

  // Set a target Pose
  auto const target_pose = []{
    geometry_msgs::msg::Pose msg;
    msg.position.x = 0.085;
    msg.position.y = 0.0;
    msg.position.z = 0.47;
    msg.orientation.x = 0.7;
    msg.orientation.y = 0.0;
    msg.orientation.z = 0.7;
    msg.orientation.w = 0.0;
    return msg;
  }();

  move_group_interface.setApproximateJointValueTarget(target_pose);

  // Or set to a named target
  //move_group_interface.setNamedTarget("home");

  // Create a plan to that target pose
  auto const [success, plan] = [&move_group_interface]{
    moveit::planning_interface::MoveGroupInterface::Plan msg;
    auto const ok = static_cast<bool>(move_group_interface.plan(msg));
    return std::make_pair(ok, msg);
  }();

  // Execute the plan
  if(success) {
    move_group_interface.execute(plan);
  } else {
    RCLCPP_ERROR(logger, "Planning failed!");
  }

  // Get the current pose of the end effector
  geometry_msgs::msg::PoseStamped current_pose = move_group_interface.getCurrentPose("wrist");

  // Print the current pose
  RCLCPP_INFO(rclcpp::get_logger("rclcpp"), "Current pose: position = [%f, %f, %f], orientation = [%f, %f, %f, %f]",
           current_pose.pose.position.x, current_pose.pose.position.y, current_pose.pose.position.z,
           current_pose.pose.orientation.x, current_pose.pose.orientation.y,
           current_pose.pose.orientation.z, current_pose.pose.orientation.w);

  // Shutdown ROS
  rclcpp::shutdown();
  spinner.join();
  return 0;
}
And add a launchfile, that starts the MoveIt planner node as well:
from launch import LaunchDescription
from launch_ros.actions import Node
from moveit_configs_utils import MoveItConfigsBuilder

def generate_launch_description():

  moveit_config = (
      MoveItConfigsBuilder("mirte")
      .robot_description(
          file_path="config/mirte_master.urdf.xacro",
      )
      .robot_description_semantic(file_path="config/mirte_master.srdf")
      .trajectory_execution(file_path="config/moveit_controllers.yaml")
      .planning_pipelines(
          pipelines=["ompl", "chomp", "pilz_industrial_motion_planner"]
      )
      .to_moveit_configs()
  )

  # Start the actual move_group node/action server
  move_group_node = Node(
      package="moveit_ros_move_group",
      executable="move_group",
      output="screen",
      parameters=[moveit_config.to_dict(), {"use_sim_time": False}],
      arguments=["--ros-args", "--log-level", "info"],
  )

  thing_node = Node(
          package='mirte_planning',
          executable='moveit_example',
          name='moveit_cpp_node',
          output='screen',
          parameters=[
            moveit_config.robot_description,
            moveit_config.robot_description_semantic,
            moveit_config.planning_pipelines,
            moveit_config.robot_description_kinematics,
          ],
  )

  return LaunchDescription([
     move_group_node,
     thing_node
  ])
From this point, you should be able to explore all option that MoveIt offers.